I am Joshua Poehls. Say hello Archives (not so) silent thoughts

Open Graph Twitter Cards and Your Blog

Have you ever wondered why some web pages have a great preview when linked on Twitter, Facebook, or Google+ while others look so lacking?

What you are seeing are formats such as the Open Graph protocol and Twitter Cards at work.

Open Graph is an open source protocol originally created by Facebook that allows your web page to describe itself using meta-tags. When people link to your web page on Facebook or Google+, these meta-tags will be parsed and used to display a snippet of content from your web page. Without these tags, the parser has to guess what to display.

Twitter Cards let you attach a summary to any tweet that contains a link to your web page. Twitter Cards use their own set of meta-tags but will fallback to using the Open Graph meta-tags in some cases.

Adding Open Graph

Adding Open Graph tags to your pages is an easy way to enhance their display on both Google+ and Facebook.

…to your home page

Open Graph requires you to import a namespace of sorts. You do this by adding a prefix attribute to your <html> tag.

<html prefix="og: http://ogp.me/ns#">

Every page is required to have a set of basic properties. Your blog’s home page should have the following meta-tags inside the <head> tag.

<meta property="og:type" content="website" />
<meta property="og:title" content="Zduck - Joshua Poehls" />
<meta property="og:image" content="http://zduck.com/logo.png" />
<meta property="og:url" content="http://zduck.com" />

The og:url property is the canonical URL of the current page. If there are multiple URLs a user could use to visit your page (e.g. www.zduck.com and zduck.com), this should contain the preferred URL.

…to your posts

The properties on your individual post pages will be slightly different. Open Graph calls a blog post an article and we’ll need to import the namespace for the article object type.

<html prefix="og: http://ogp.me/ns# article: http://ogp.me/ns/article#">
<meta property="og:type" content="article" />
<meta property="og:site_name" content="Zduck - Joshua Poehls" />
<meta property="og:title" content="Title of my blog post" />
<meta property="og:image" content="http://zduck.com/mypost/image.png" />
<meta property="og:url" content="http://zduck.com/mypost" />
<meta property="og:description" content="One or two sentence description or summary of my blog post" />
<meta property="article:published_time" content="2013-01-28" />

article:published_time needs to be an ISO 8601 formatted timestamp. It’ll look something like 2013-01-28 or 2013-01-28T00:37Z if you include the UTC time.

If you use categories or tags then you can include properties for those as well.

<meta property="article:tag" content="Category 1" />
<meta property="article:tag" content="Category 2" />

Facebook requires your og:image to be at least 50px by 50px but prefers a minimum of 200px by 200px. It is a good idea to create a separate copy of your image specifically sized for Facebook.

Adding Twitter Cards

Twitter Cards have their own set of meta-tags that you are required to add to your page. Unlike Open Graph, you aren’t required to import the namespace prefix on your page.

<meta name="twitter:card" content="summary" />
<meta name="twitter:title" content="Title of my blog post" />
<meta name="twitter:url" content="http://zduck.com/mypost" />
<meta name="twitter:image" content="http://zduck.com/mypost/twitter-image.png" />
<meta name="twitter:description" content="One or two sentence description or summary of my blog post" />

If you have a Twitter account then you can link to it as the author of the article.

<meta name="twitter:creator" content="@JoshuaPoehls" />

And if you have an account that represents your blog you can link to it as the publisher of the article.

<meta name="twitter:site" content="@MyBlog" />

Twitter Cards require a twitter:url but will fallback to og:url if it isn’t found. Twitter also has fallbacks for twitter:image to og:image, twitter:title to og:title, and twitter:description to og:description. If you already have the Open Graph properties on your page then there isn’t much point in duplicating them for Twitter unless you want to change how the information is displayed on Twitter specifically.

Twitter requires your images to be 120px by 120px and will resize and crop any image that is too large. It is a good idea to have a copy of your image sized for Twitter and use the twitter:image tag in addition to og:image.

Remember that to light up Twitter Cards for your website you have to apply for participation with Twitter.

Further Reading

Both the Open Graph protocol and Twitter Cards support a lot more than what I’ve covered. These formats have a lot to offer beyond the world of blogging. Do yourself a favor and skim the Open Graph protocol and Twitter Card documentation for an idea of all they can do.

Also, while Google+ supports the Open Graph protocol it actually prefers schema.org microdata for building its snippets. Google, Yahoo!, Bing, and other search engines also use schema.org microdata to better represent your pages in search results. That is a topic for another time.

Facebook also has documentation regarding their use of the Open Graph protocol.

Testing Tools

Make sure you’ve implemented the meta-tags correctly by using a few tools to check your pages.

Bonus Tip

You can claim your domain with Facebook and use their Insights dashboard to see how well your links are doing.
⦿

Using bookmarks to quickly navigate in PowerShell

There are a few folders that I spend a lot of time and it is surprisingly slow to type cd c:\path\to\my\project many times a day. I solved this by creating a module that allows me to bookmark directories and navigate to them using aliases. Simply put, I can shorten the previous command to g project.

Usage looks like this:

Set-Bookmark <name> <path>
Get-Bookmark # to list all
Get-Bookmark <name>
Remove-Bookmark <name>
Clear-Bookmarks
Invoke-Bookmark <name>

I alias Invoke-Bookmark as g for speed.

All you have to do is import the module in your profile and initialize your bookmarks.

# Microsoft.PowerShell_profile.ps1

Import-Module bookmarks.psm1
Set-Alias g Invoke-Bookmark

Set-Bookmark project c:\path\to\my\project

Here is the module. Happy bookmarking!

# bookmarks.psm1
# Exports: Set-Bookmark, Get-Bookmark, Remove-Bookmark, Clear-Bookmarks, Invoke-Bookmark

# holds hash of bookmarked locations
$_bookmarks = @{}

function Get-Bookmark() {
  Write-Output ($_bookmarks.GetEnumerator() | sort Name)
}

function Remove-Bookmark($key) {
<#
.SYNOPSIS
  Removes the bookmark with the given key.
#>
  if ($_bookmarks.keys -contains $key) {
    $_bookmarks.remove($key)
  }
}

function Clear-Bookmarks() {
<#
.SYNOPSIS
  Clears all bookmarks.
#>
  $_bookmarks.Clear()
}

function Set-Bookmark($key, $location) {
<#
.SYNOPSIS
  Bookmarks the given location or the current location (Get-Location).
#>
  # bookmark the current location if a specific path wasn't specified
  if ($location -eq $null) {
    $location = (Get-Location).Path
  }

  # make sure we haven't already bookmarked this location (no need to clutter things)
  if ($_bookmarks.values -contains $location) {
    Write-Warning ("Already bookmarked as: " + ($_bookmarks.keys | where { $_bookmarks[$_] -eq $location }))
    return
  }

  # if no specific key was specified then auto-set the key to the next bookmark number
  if ($key -eq $null) {
    $existingNumbers = ($_bookmarks.keys | Sort-Object -Descending | where { $_ -is [int] })
    if ($existingNumbers.length -gt 0) {
      $key = $existingNumbers[0] + 1
    }
    else {
      $key = 1
    }
  }

  $_bookmarks[$key] = $location
}

function Invoke-Bookmark($key) {
<#
.SYNOPSIS
  Goes to the location specified by the given bookmark.
#>
  if ([string]::IsNullOrEmpty($key)) {
    Get-Bookmark
    return
  }

  if ($_bookmarks.keys -contains $key) {
    Push-Location $_bookmarks[$key]
  }
  else {
    Write-Warning "No bookmark set for the key: $key"
  }
}

Export-ModuleMember Get-Bookmark, Remove-Bookmark, Clear-Bookmarks, Set-Bookmark, Invoke-Bookmark
⦿

Benchmarking scripts and programs with PowerShell

UNIX has the time command that will measure the execution time of a program. Timings are returned for the wall clock and CPU time. It looks something like this.

$ time ping google.com -c 1
PING google.com (74.125.225.232) 56(84) bytes of data.
64 bytes from dfw06s26-in-f8.1e100.net (74.125.225.232): icmp_req=1 ttl=54 time=19.7 ms

--- google.com ping statistics ---
1 packets transmitted, 1 received, 0% packet loss, time 0ms
rtt min/avg/max/mdev = 19.767/19.767/19.767/0.000ms

real   0m0.173s
user   0m0.010s
sys    0m0.100s

The real, user, and sys information at the end is the output from time. StackOverflow has a great explanation of what those values mean.

PowerShell’s equivalent of time is Measure-Command. Unfortunately it only measures wall clock time. It also swallows the output of the command you are measuring.

PS> Measure-Command { ping google.com -n 1 }
Days              : 0
Hours             : 0
Minutes           : 0
Seconds           : 0
Milliseconds      : 282
Ticks             : 2822765
TotalDays         : 3.26708912037037E-06
TotalHours        : 7.84101388888889E-05
TotalMinutes      : 0.00470460833333333
TotalSeconds      : 0.2822765
TotalMilliseconds : 282.2765

You might prefer calling ToString() on the result to make it more readable.

PS> (Measure-Command { ping google.com -n 1 }).ToString()
00:00:00.2822765

One thing that time and Measure-Command have in common is that neither of them is well suited to benchmarking. That is, running the same command multiple times and providing statistics on the timings of those runs.

Enter Benchmark-Command. This PowerShell function does exactly that.

PS> Benchmark-Command { ping google.com -n 1 } -Samples 3
Pinging google.com [74.125.225.226] with 32 bytes of data:
Reply from 74.125.225.226: bytes=32 time=20ms TTL=54

Ping statistics for 74.125.225.226:
    Packets: Sent = 1, Received = 1, Lost = 0 (0% loss),
Approximate round trip times in milli-seconds:
    Minimum = 20ms, Maximum = 20ms, Average = 20ms

Pinging google.com [74.125.225.226] with 32 bytes of data:
Reply from 74.125.225.226: bytes=32 time=17ms TTL=54

Ping statistics for 74.125.225.226:
    Packets: Sent = 1, Received = 1, Lost = 0 (0% loss),
Approximate round trip times in milli-seconds:
    Minimum = 17ms, Maximum = 17ms, Average = 17ms

Pinging google.com [74.125.225.226] with 32 bytes of data:
Reply from 74.125.225.226: bytes=32 time=18ms TTL=54

Ping statistics for 74.125.225.226:
    Packets: Sent = 1, Received = 1, Lost = 0 (0% loss),
Approximate round trip times in milli-seconds:
    Minimum = 18ms, Maximum = 18ms, Average = 18ms

Avg: 56.2542ms
Min: 49.542ms
Max: 66.7821ms

We can also swallow the command output if we want a more minimal display. This is very useful when taking a higher number of samples.

PS> Benchmark-Command { ping -n 1 google.com } -Samples 50 -Silent
..................................................
Avg: 46.9643ms
Min: 39.887ms
Max: 74.8587ms

Import this in your profile and alias it to time and you get a nice counterpart to UNIX’s time command with a few more bells and whistles.

# Microsoft.PowerShell_profile.ps1

Import-Module benchmark.psm1
Set-Alias time Benchmark-Command
# benchmark.psm1
# Exports: Benchmark-Command

function Benchmark-Command ([ScriptBlock]$Expression, [int]$Samples = 1, [Switch]$Silent, [Switch]$Long) {
<#
.SYNOPSIS
  Runs the given script block and returns the execution duration.
  Hat tip to StackOverflow. http://stackoverflow.com/questions/3513650/timing-a-commands-execution-in-powershell
  
.EXAMPLE
  Benchmark-Command { ping -n 1 google.com }
#>
  $timings = @()
  do {
    $sw = New-Object Diagnostics.Stopwatch
    if ($Silent) {
      $sw.Start()
      $null = & $Expression
      $sw.Stop()
      Write-Host "." -NoNewLine
    }
    else {
      $sw.Start()
      & $Expression
      $sw.Stop()
    }
    $timings += $sw.Elapsed
    
    $Samples--
  }
  while ($Samples -gt 0)
  
  Write-Host
  
  $stats = $timings | Measure-Object -Average -Minimum -Maximum -Property Ticks
  
  # Print the full timespan if the $Long switch was given.
  if ($Long) {  
    Write-Host "Avg: $((New-Object System.TimeSpan $stats.Average).ToString())"
    Write-Host "Min: $((New-Object System.TimeSpan $stats.Minimum).ToString())"
    Write-Host "Max: $((New-Object System.TimeSpan $stats.Maximum).ToString())"
  }
  else {
    # Otherwise just print the milliseconds which is easier to read.
    Write-Host "Avg: $((New-Object System.TimeSpan $stats.Average).TotalMilliseconds)ms"
    Write-Host "Min: $((New-Object System.TimeSpan $stats.Minimum).TotalMilliseconds)ms"
    Write-Host "Max: $((New-Object System.TimeSpan $stats.Maximum).TotalMilliseconds)ms"
  }
}

Export-ModuleMember Benchmark-Command
⦿

An MKLINK PowerShell Module

MKLINK is a very useful utility on Windows. Unfortunately there aren’t any native PowerShell functions that replace it so we still have to shell out to the command prompt.

This can be made less painful with a helper function that will pipe all arguments to the MKLINK command.

function mklink { cmd /c mklink $args }

Personally though, I prefer to use native PowerShell functions whenever possible so I put together a module that provides wrappers for the key functionality of MKLINK.

Usage looks like this:

New-Symlink <link_path> <target_path> <force?>
New-Hardlink <link_path> <target_path> <force?>
New-Junction <link_path> <target_path> <force?>
mklink <args> # raw pipe to mklink

Import this module in your profile and you’ll have it whenever you need it.

# Microsoft.PowerShell_profile.ps1

Import-Module mklink.psm1
# mklink.psm1
# Exports: New-Symlink, New-Hardlink, New-Junction, mklink

function Force-Resolve-Path {
    <#
    .SYNOPSIS
        Calls Resolve-Path but works for files that don't exist.
    .REMARKS
        From http://devhawk.net/2010/01/21/fixing-powershells-busted-resolve-path-cmdlet/
    #>
    param (
        [string] $FileName
    )
    
    $FileName = Resolve-Path $FileName -ErrorAction SilentlyContinue `
                                       -ErrorVariable _frperror
    if (-not($FileName)) {
        $FileName = $_frperror[0].TargetObject
    }
    
    return $FileName
}

function New-Symlink {
    <#
    .SYNOPSIS
        Creates a symbolic link.
    #>
    param (
        [Parameter(Position=0, Mandatory=$true)]
        [string] $Link,
        [Parameter(Position=1, Mandatory=$true)]
        [string] $Target,
        [Parameter(Position=2)]
        [switch] $Force
    )

    Invoke-MKLINK -Link $Link -Target $Target -Symlink -Force $Force
}

function New-Hardlink {
    <#
    .SYNOPSIS
        Creates a hard link.
    #>
    param (
        [Parameter(Position=0, Mandatory=$true)]
        [string] $Link,
        [Parameter(Position=1, Mandatory=$true)]
        [string] $Target,
        [Parameter(Position=2)]
        [switch] $Force
    )

    Invoke-MKLINK -Link $Link -Target $Target -HardLink -Force $Force
}

function New-Junction {
    <#
    .SYNOPSIS
        Creates a directory junction.
    #>
    param (
        [Parameter(Position=0, Mandatory=$true)]
        [string] $Link,
        [Parameter(Position=1, Mandatory=$true)]
        [string] $Target,
        [Parameter(Position=2)]
        [switch] $Force
    )

    Invoke-MKLINK -Link $Link -Target $Target -Junction -Force $Force
}

function Invoke-MKLINK {
    <#
    .SYNOPSIS
        Creates a symbolic link, hard link, or directory junction.
    #>
    [CmdletBinding(DefaultParameterSetName = "Symlink")]
    param (
        [Parameter(Position=0, Mandatory=$true)]
        [string] $Link,
        [Parameter(Position=1, Mandatory=$true)]
        [string] $Target,

        [Parameter(ParameterSetName = "Symlink")]
        [switch] $Symlink = $true,
        [Parameter(ParameterSetName = "HardLink")]
        [switch] $HardLink,
        [Parameter(ParameterSetName = "Junction")]
        [switch] $Junction,
        [Parameter()]
        [bool] $Force
    )
    
    # Resolve the paths incase a relative path was passed in.
    $Link = (Force-Resolve-Path $Link)
    $Target = (Force-Resolve-Path $Target)

    # Ensure target exists.
    if (-not(Test-Path $Target)) {
        throw "Target does not exist.`nTarget: $Target"
    }

    # Ensure link does not exist.
    if (Test-Path $Link) {
        if ($Force) {
            Remove-Item $Link -Recurse -Force
        }
        else {
            throw "A file or directory already exists at the link path.`nLink: $Link"
        }
    }

    $isDirectory = (Get-Item $Target).PSIsContainer
    $mklinkArg = ""

    if ($Symlink -and $isDirectory) {
        $mkLinkArg = "/D"
    }

    if ($Junction) {
        # Ensure we are linking a directory. (Junctions don't work for files.)
        if (-not($isDirectory)) {
            throw "The target is a file. Junctions cannot be created for files.`nTarget: $Target"
        }

        $mklinkArg = "/J"
    }

    if ($HardLink) {
        # Ensure we are linking a file. (Hard links don't work for directories.)
        if ($isDirectory) {
            throw "The target is a directory. Hard links cannot be created for directories.`nTarget: $Target"
        }

        $mkLinkArg = "/H"
    }

    # Capture the MKLINK output so we can return it properly.
    # Includes a redirect of STDERR to STDOUT so we can capture it as well.
    $output = cmd /c mklink $mkLinkArg `"$Link`" `"$Target`" 2>&1

    if ($lastExitCode -ne 0) {
        throw "MKLINK failed. Exit code: $lastExitCode`n$output"
    }
    else {
        Write-Output $output
    }
}

function mklink {
    <#
    .SYNOPSIS
        Helper function for calling mklink directly.
        All arguments are piped through to mklink.
        
        Hat tip to http://stackoverflow.com/questions/894430/powershell-hard-and-soft-links#comment9823010_5549583
    #>
    cmd /c mklink $args
}

Export-ModuleMember New-Symlink, New-Hardlink, New-Junction, mklink

I’ve heard it rumored that the PowerShell Community Extensions project has a lot of these functions as well, and more. It might be worth looking into if you want a more robust solution.

⦿

Killing Processes In Disconnected Terminal Service Sessions

Usually it is best to configure your terminal service policy to log out disconnected sessions, however there may be cases where you only want to kill specific applications when the user disconnects.

This is easy to do with a PowerShell script that you run periodically as a scheduled task. The processes won’t be killed immediately when the user disconnects but will be killed shortly after.

This script will, by default, only kill the OUTLOOK processes in disconnected sessions after waiting 15 seconds for it to gracefully close. It is trivial to tweak the script to kill whichever processes you care about.

# kill-processes.ps1

# This script supports being run with -WhatIf and -Confirm parameters.
[CmdletBinding(SupportsShouldProcess=$true, ConfirmImpact='Medium')]
param (
    # Regex of the states that should be included in the process killing field.
    [string]$IncludeStates = '^(Disc)$', # Only DISCONNECTED sessions by default.
    # Regex of the processes to kill
    [string]$KillProcesses = '^(OUTLOOK)$', # Only OUTLOOK by default.
    [int]$GracefulTimeout = 15 # Number of seconds to wait for a graceful shutdown before forcefully closing the program.
)

function Get-Sessions
{
    # `query session` is the same as `qwinsta`

    # `query session`: http://technet.microsoft.com/en-us/library/cc785434(v=ws.10).aspx

    # Possible session states:
    <#
    http://support.microsoft.com/kb/186592
    Active. The session is connected and active.
    Conn.   The session is connected. No user is logged on.
    ConnQ.  The session is in the process of connecting. If this state
            continues, it indicates a problem with the connection.
    Shadow. The session is shadowing another session.
    Listen. The session is ready to accept a client connection.
    Disc.   The session is disconnected.
    Idle.   The session is initialized.
    Down.   The session is down, indicating the session failed to initialize correctly.
    Init.   The session is initializing.
    #>

    # Snippet from http://poshcode.org/3062
    # Parses the output of `qwinsta` into PowerShell objects.
    $c = query session 2>&1 | where {$_.gettype().equals([string]) }

    $starters = New-Object psobject -Property @{"SessionName" = 0; "Username" = 0; "ID" = 0; "State" = 0; "Type" = 0; "Device" = 0;};
     
    foreach($line in $c) {
         try {
             if($line.trim().substring(0, $line.trim().indexof(" ")) -eq "SESSIONNAME") {
                $starters.Username = $line.indexof("USERNAME");
                $starters.ID = $line.indexof("ID");
                $starters.State = $line.indexof("STATE");
                $starters.Type = $line.indexof("TYPE");
                $starters.Device = $line.indexof("DEVICE");
                continue;
            }
           
            New-Object psobject -Property @{
                "SessionName" = $line.trim().substring(0, $line.trim().indexof(" ")).trim(">")
                ;"Username" = $line.Substring($starters.Username, $line.IndexOf(" ", $starters.Username) - $starters.Username)
                ;"ID" = $line.Substring($line.IndexOf(" ", $starters.Username), $starters.ID - $line.IndexOf(" ", $starters.Username) + 2).trim()
                ;"State" = $line.Substring($starters.State, $line.IndexOf(" ", $starters.State)-$starters.State).trim()
                ;"Type" = $line.Substring($starters.Type, $starters.Device - $starters.Type).trim()
                ;"Device" = $line.Substring($starters.Device).trim()
            }
        } catch {
            throw $_;
            #$e = $_;
            #Write-Error -Exception $e.Exception -Message $e.PSMessageDetails;
        }
    }
}

# Helper function for getting the singular or plural form of
# a word based on the given count.
# Because we want proper log messages.
function Get-ProperWord([string]$singularWord, [int]$count) {
    if ($count -eq 0 -or $count -gt 1) {
        if ($singularWord.EndsWith("s")) {
            return "$($singularWord)es";
        }
        else {
            return "$($singularWord)s";
        }
    }
    else {
        return $singularWord;
    }
}

# Get a list of all terminal sessions that are in the state we care about.
$IncludedSessions = Get-Sessions `
                        | Where { $_.State -match $IncludeStates } `
                        | Select -ExpandProperty ID

# Get a list of all processes in one of those terminal sessions
# that match a process we want to kill.
$SessionProcesses = $IncludedSessions `
    | % { $id = $_;
          Get-Process `
            | Where { $_.SessionID -eq $id -and $_.Name -match $KillProcesses } }

# Get some words to use in log output.
$wordSecond = $(Get-ProperWord 'second' $GracefulTimeout)
$wordProcess = $(Get-ProperWord 'process' $SessionProcesses.Length)

if ($SessionProcesses.Length -gt 0) {
    # Initiate a graceful shutdown of the processes.
    # http://powershell.com/cs/blogs/tips/archive/2010/05/27/stopping-programs-gracefully.aspx
    Write-Output "Gracefully closing $($SessionProcesses.Length) $wordProcess"
    $SessionProcesses `
        | % { if ($PSCmdlet.ShouldProcess("$($_.Name) ($($_.Id))", "CloseMainWindow")) { $_.CloseMainWindow() } } `
        | Out-Null

    # Wait X seconds for the programs to close gracefully.
    Write-Output "Waiting $GracefulTimeout $wordSecond for the $wordProcess to close"
    if ($GracefulTimeout -gt 0) {
        if ($PSCmdlet.ShouldProcess("Current Process", "Start-Sleep")) {
            Start-Sleep -Seconds $GracefulTimeout
        }
    }

    # Force any remaining processes to close, the hard way.
    Write-Output "Forcefully closing any remaining processes"
    $SessionProcesses `
        | Where { $_.HasExited -ne $true } `
        | Stop-Process -ErrorAction SilentlyContinue
}
else {
    Write-Output "No processes to close"
}
⦿

Crime Rates Are Dropping

We all know the news is biased. Media slants to the left or the right. Bias is natural and very difficult to avoid.

I don't read the news much but the recent public shootings in Aurora, Colorado and at the Sikh temple in Wisconsin have made my social media feeds flutter with the topic of gun control with points from all sides.

Today I listened to an episode of Common Sense with Dan Carlin, a podcast that I occasionally listen to and always enjoy. He does a good job, in my opinion, of thinking about situations from both sides of the fence.

Dan listed several statistics from the DOJ's website. Some I expected, but a few caught me off guard.

As I said, media is slanted, we know this. So when I hear how our country is violent and things are worse than ever, I figure it isn't nearly that bad. But, I do figure it is worse than it was to some degree. Well the numbers don't seem to agree.

In fact, it would seem that this country has never been a safer place.

The chart above was just for 2005 and doesn't give you much for comparison. Here are the numbers for victims of all types of crime for 1993 and 2010. See for yourself.

Bureau of Justice Statistics. Generated using the NCVS Victimization Analysis Tool at www.bjs.gov. 13-Aug-12

This isn't an opinion or bias, just facts. Crime is going down, not up. As of 2010, violent crime specifically was a mere 29% of what it was just 17 years prior. That is a massive drop.

I'm not saying that this is good enough, that we should stop trying. What I am saying is that things are a heck of a lot better than they were.

I don't believe the solution to violence in America will be as simple as banning weapons. Just like I wouldn't propose banning phones as a solution to the telling of lies. Medium is not cause. We need to be more creative when trying to solve this problem.

Raw data for the Bureau of Justice Statistics
Victimization by Type
  1993 2010
Violent Victimization 16,822,618 4,935,983
Rape/Sexual Assault 898,239 268,574
Robbery 1,752,667 568,510
Aggravated Assault 3,481,055 857,751
Simple Assault 10,690,657 3,241,148
Property Victimization 35,093,887 15,411,610
Household Burglary 6,378,721 3,176,181
Motor Vehicle Theft 1,921,179 606,991
Theft 26,793,987 11,628,437
⦿

PowerShell, batch files, and exit codes. Recipes & Secrets.

TL;DR;

Update: If you want to save some time, skip reading this and just use my PowerShell Script Boilerplate. It includes an excellent batch file wrapper, argument escaping, and error code bubbling.

PowerShell.exe doesn’t return correct exit codes when using the -File option. Use -Command instead. (Vote for this issue on Microsoft Connect.)

This is a batch file wrapper for executing PowerShell scripts. It forwards arguments to PowerShell and correctly bubbles up the exit code (when it can).

PowerShell.exe still returns a passing (0) exit code when a ParserError is thrown. Even when using -Command. I haven’t found a workaround for this. (Vote for this issue on Microsoft Connect.)

You can use black magic to include spaces and quotes in the arguments you pass through the batch file wrapper to PowerShell.

PowerShell

PowerShell is a great scripting environment, and it is my preferred tool for writing build scripts for .NET apps. Exit codes are vital in build scripts because they are how your Continuous Integration server knows whether the build passed or failed.

This is a quick tour of working with exit codes in PowerShell scripts and batch files. I’m including batch files because they are often necessary to wrap the execution of your PowerShell scripts.

Let’s start easy. Say you need to run a command line app or batch file from your PowerShell script. How can you check the exit code of that process?

# script.ps1

cmd /C exit 1
Write-Host $LastExitCode    # 1

$LastExitCode is a special variable that holds the exit code of the last Windows based program that was run. So says the documentation.

Remember though, $LastExitCode doesn’t do squat for PowerShell commands. Use $? for that.

# script.ps1

Get-ChildItem "C:\"
Write-Host $?    # True

Get-ChildItem "Z:\some\non-existant\path"
Write-Host $?    # False

Anytime you run an external command like this, you need to check the exit code and throw an exception if needed. Otherwise the PowerShell script will keep right on trucking after a failure.

# script.ps1

cmd /C exit 1
if ($LastExitCode -ne 0) {
    throw "Command failed with exit code $LastExitCode."
}
Write-Host "You'll never see this."

Writing these assertions all the time will get old. Fortunately you can use a helper function, like this one found in the excellent psake project.

# script.ps1

function Exec
{
    [CmdletBinding()]
    param (
        [Parameter(Position=0, Mandatory=1)]
        [scriptblock]$Command,
        [Parameter(Position=1, Mandatory=0)]
        [string]$ErrorMessage = "Execution of command failed.`n$Command"
    )
    & $Command
    if ($LastExitCode -ne 0) {
        throw "Exec: $ErrorMessage"
    }
}

Exec { cmd /C exit 1 }
Write-Host "You'll never see this."

Throwing & exit codes

The throw keyword is how you generate a terminating error in PowerShell. It will, sometimes, cause your PowerShell script to return a failing exit code (1). Wait, when does it not cause a failing exit code, you ask? This is where PowerShell’s warts start to show. Let me demonstrate some scenarios.

# broken.ps1

throw "I'm broken"

From the PowerShell command prompt:

PS> .\broken.ps1
I'm broken.
At C:\broken.ps1:1 char:6
+ throw <<<<  "I'm broken."
    + CategoryInfo          : OperationStopped: (I'm broken.:String) [], RuntimeException
    + FullyQualifiedErrorId : I'm broken.
    
PS> $LastExitCode
1

From the Windows command prompt:

> PowerShell.exe -NoProfile -NonInteractive -ExecutionPolicy unrestricted -Command ".\broken.ps1"
I'm broken.
At C:\broken.ps1:1 char:6
+ throw <<<<  "I'm broken."
    + CategoryInfo          : OperationStopped: (I'm broken.:String) [], RuntimeException
    + FullyQualifiedErrorId : I'm broken.
    
> echo %errorlevel%
1

That worked, too. Good.

Again, from the Windows command prompt:

> PowerShell.exe -NoProfile -NonInteractive -ExecutionPolicy unrestricted -File ".\broken.ps1"
I'm broken.
At C:\broken.ps1:1 char:6
+ throw <<<<  "I'm broken."
    + CategoryInfo          : OperationStopped: (I'm broken.:String) [], RuntimeException
    + FullyQualifiedErrorId : I'm broken.

> echo %errorlevel%
0

Whoa! We still saw the error, but PowerShell returned a passing exit code. What the heck?! Yes, this is the wart.

A workaround for -File

-File allows you to pass in a script for PowerShell to execute, however terminating errors in the script will not cause PowerShell to return a failing exit code. I have no idea why this is the case. If you know why, please share!

A workaround is to add a trap statement to the top of your PowerShell script. (Thanks, Chris Oldwood, for pointing this out!)

# broken.ps1

trap
{
    Write-Error $_
    exit 1
}
throw "I'm broken."

From the Windows command prompt:

> PowerShell.exe -NoProfile -NonInteractive -ExecutionPolicy unrestricted -File ".\script.ps1"
C:\broken.ps1 : I'm broken.
    + CategoryInfo          : NotSpecified: (:) [Write-Error], WriteErrorException
    + FullyQualifiedErrorId : Microsoft.PowerShell.Commands.WriteErrorException,broken.ps1

> echo %errorlevel%
1

Notice that we got the correct exit code this time, but our error output didn’t include as much detail. Specifically, we didn’t get the line number of the error like we were getting in the previous tests. So it isn’t a perfect workaround.

Remember. Use -Command instead of -File whenever possible. If for some reason you must use -File or your script needs to support being run that way, then use the trap workaround above.

-Command can still fail

I’ve discovered that PowerShell will still exit with a success code (0) when a ParserError is thrown. Even when using -Command.

From the Windows command prompt:

> PowerShell.exe -NoProfile -NonInteractive -Command "Write-Host 'You will never see this.'" "\"
The string starting:
At line:1 char:39
+ Write-Host 'You will never see this.'  <<<< "
is missing the terminator: ".
At line:1 char:40
+ Write-Host 'You will never see this.' " <<<<
    + CategoryInfo          : ParserError: (:String) [], ParentContainsErrorRecordException
    + FullyQualifiedErrorId : TerminatorExpectedAtEndOfString

> echo %errorlevel%
0

I’m not aware of any workaround for this behavior. This is very disturbing, because these parser errors can be caused by arguments (as I demonstrated above). This means there is no way to guarantee your script will exit with the correct code when it fails.

Note: This was tested in PowerShell v2, on Windows 7 (x64).

There are other known bugs with PowerShell’s exit codes. Beware.

Batch files

I mentioned early on that it is often necessary to wrap the execution of your PowerShell script in a batch file. Some common reasons for this might be:

  • You want users of your script to be able to double-click to run it.
  • Your build runner doesn’t support execution of PowerShell scripts directly.

Whatever the reason, writing a batch file wrapper for a PowerShell script is easy. You just need to make sure that your batch file properly returns the exit code from PowerShell. Otherwise, your PowerShell script might fail and your batch file would return a successful exit code (0).

This is a safe template for you to use. Bookmark it.

Update: I’ve created a much better batch file wrapper for my PowerShell scripts. I recommend you ignore the one below and use my new one instead.

:: script.bat

@ECHO OFF
PowerShell.exe -NoProfile -NonInteractive -ExecutionPolicy unrestricted -Command "& %~d0%~p0%~n0.ps1" %*
EXIT /B %errorlevel%

This wrapper will execute the PowerShell script with the same file name (i.e., script.ps1 if the batch file is named script.bat), and then exit with the same code that PowerShell exited with. It will also forward any arguments passed to the batch file, to the PowerShell script.

Let’s test it out.

# script.ps1

param($Arg1, $Arg2)
Write-Host "Arg 1: $Arg1"
Write-Host "Arg 2: $Arg2"

From the Windows command prompt:

> script.bat happy scripting
Arg 1: happy
Arg 2: scripting

What if we want “happy scripting” to be passed as a single argument?

> script.bat "happy scripting"
Arg 1: happy
Arg 2: scripting

Well that didn’t work at all. This is the secret recipe.

> script.bat "'Happy scripting with single '' and double \" quotes!'"
Arg 1: Happy scripting with single ' and double " quotes!
Arg 2:

Please don’t ask me to explain this black magic, I only know that it works. Much credit to this StackOverflow question for helping me solve this!

For comparison, here is how you would do it if you were executing the script from PowerShell, without using the batch file wrapper.

From the PowerShell command prompt:

PS> .\script.ps1 happy scripting
Arg 1: happy
Arg 2: scripting

PS> .\script.ps1 "Happy scripting with single ' and double `" quotes included!"
Arg 1: Happy scripting with single ' and double " quotes included!
Arg 2:

That’s all folks!

⦿

Syntax highlighting for Nginx in VIM

Thanks to Evan Miller, adding VIM syntax highlighting for Nginx config files is a breeze.

First, install VIM if you haven’t already. On Arch Linux, it goes like this:

> pacman -Sy vim

Create a folder for your VIM syntax files.

> mkdir -p ~/.vim/syntax/

Download the syntax highlighting plugin.

> curl http://www.vim.org/scripts/download_script.php?src_id=14376 -o ~/.vim/syntax/nginx.vim

Add it to VIM’s file type definitions. Make sure to adjust the path to your Nginx installation if you need to.

> echo "au BufRead,BufNewFile /etc/nginx/conf/* set ft=nginx" >> ~/.vim/filetype.vim

Now enable syntax highlighting in your .vimrc file.

> echo "syntax enable" >> ~/.vimrc

That’s it. Now you’ll have nice colors when you edit your Nginx configs with VIM!

> vim /etc/nginx/conf/nginx.conf

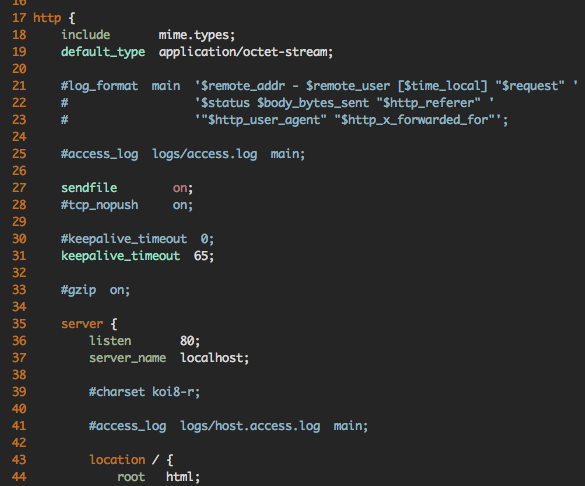
Screenshot of VIM with syntax highlighting in an Nginx config file

Screenshot of VIM with syntax highlighting in an Nginx config file

⦿

Storing your Raspberry Pi configuration in Git

Storing your Raspberry Pi’s configuration files in Git is a great way to protect yourself from really bad accidents. You get a backup of all your configs and revision control to rollback those nasty changes. Best of all, you don’t have to manually create backup copies of each individual file. (cp rc.conf rc.conf.bak anyone?)

I should note that I’m running Arch Linux ARM, but this should apply fairly equally to Debian and other distros.

First, install Git (if you haven’t already).

> pacman -Sy git

Arch has a convention of storing all configuration files in /etc. So we will initialize our Git repo there.

> cd /etc
> git init

We only want to store the configuration files that we’ve actually changed in Git. We’ll use a .gitignore file for that.

> vim .gitignore

Here is what mine looks like right now.

# Blacklist everything.
*

# Whitelist the files we care about.
!rc.conf
!rc.local
!ntp.conf
!resolv.conf

!ddclient/
!ddclient/ddclient.conf

!nginx/
!nginx/conf/
!nginx/conf/nginx.conf

The ! prefix negates the pattern, basically creating a whitelist. Cool, huh?

Now we can do our initial commit.

> git add -A
> git commit -m "Added initial configs."

Remember to add any new config files to your .gitignore file and always commit your changes!

For added security you should push your repository to a remote. BitBucket offers free private repositories, if you don’t have a paid Github account.

⦿

Soft links, hard links, junctions, oh my! Symlinks on Windows, a how-to

First, a quick definition of terms. There are three kinds of “symlinks” on Windows.

  • soft links (also called symlinks, or symbolic links)
  • hard links
  • junctions (a type of soft link only for directories)

Soft links can be created for files or directories.

Hard links can only be created for files.

Both soft and hard links must be created on the same volume as the target. i.e. You can’t link something on C:\ to something on D:\.

You can read more about hardlinks and junctions on MSDN.

This is where the difference between soft and hard links is most evident.

Deleting the target will cause soft links to stop working. What it points to is gone. Hard links however will keep right on working until you delete the hard link itself. The hard link acts just like the original file, because for all intents and purposes, it is the original file.

Junctions

Windows also has another type of link just for directories, called Junctions.

Junctions look and act like soft links. The key difference is that they allow you to link directories that are located on different local volumes (but still on the same computer). You can’t create a junction to a network location.

Create a soft link to a directory.

c:\symlink_test> mklink symlink_dir real_dir
symbolic link created for symlink_dir <<===>> real_dir

Create junction link to a directory.

c:\symlink_test> mklink /J junction_dir real_dir
Junction created for junction_dir <<===>> real_dir

Create a soft link to a file.

c:\symlink_test> mklink symlink_file.txt real_file.txt
symbolic link created for symlink_file.txt <<===>> real_file.txt

Create a hard link to a file.

c:\symlink_test> mklink /H hardlink_file.txt real_file.txt
Hardlink created for hardlink_file.txt <<===>> real_file.txt

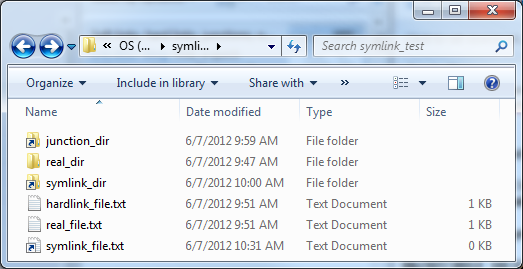
What they look like.

c:\symlink_test> dir
Volume in drive C is OS
Volume Serial Number is 7688-08EC

Directory of c:\symlink_test

06/07/2012  10:32 AM    <DIR>          .
06/07/2012  10:32 AM    <DIR>          ..
06/07/2012  09:51 AM                15 hardlink_file.txt
06/07/2012  09:59 AM    <JUNCTION>     junction_dir [c:\symlink_test\real_dir]
06/07/2012  09:47 AM    <DIR>          real_dir
06/07/2012  09:51 AM                15 real_file.txt
06/07/2012  10:00 AM    <SYMLINKD>     symlink_dir [real_dir]
06/07/2012  10:31 AM    <SYMLINK>      symlink_file.txt [real_file.txt]
               3 File(s)             30 bytes
               5 Dir(s)  145,497,268,224 bytes free

Screenshot of folder in Windows Explorer

Screenshot of folder in Windows Explorer

Note for PowerShell users:
MKLINK isn’t an executable that you can just call from PowerShell. You have to call it through the command prompt.

cmd /c mklink /D symlink_dir real_dir

Alternatively, you can use this module I wrote that has native PowerShell wrappers for MKLINK.

Read about MKLINK on MSDN.

Using FSUTIL

FSUTIL is another way to create hard links (but not soft links). This is the same as mklink /H.

c:\symlink_test> where fsutil
c:\Windows\System32\fsutil.exe

c:\symlink_test> fsutil hardlink create hardlink_file.txt real_file.txt
Hardlink created for c:\symlink_test\hardlink_file.txt <<===>> c:\symlink_test\real_file.txt

Read about FSUTIL on MSDN.

Using Junction

Junction is a tool provided by Sysinternals and provides another way to create junctions. Same as mklink /J. It also has some other tools for working with junctions that I won’t cover here.

c:\symlink_test> junction junction_dir real_dir
Junction v1.06 - Windows junction creator and reparse point viewer
Copyright (C) 2000-2010 Mark Russinovich
Sysinternals - www.sysinternals.com

Created: c:\symlink_test\junction_dir
Targetted at: c:\symlink_test\real_dir

Download the Junction tool from Sysinternals.

⦿